Lab Facilities
Last updated: Mon Oct 13, 2025 - Updated lab desktop users information and an outdated piece of TACC resource information
0. How to make changes to this wiki
Access wiki from your lab computer to make changes: go to
/www/sites/cqme/Modify source code in the subfolder
doc/Make sure you have
sphinxandsphinx_rtd_themeinstalledCheck by running
which sphinx-build. If this command returns nothing, then you need to install these packages. To do so, run:pip3 install sphinx==5.1.1 sphinx_rtd_theme==1.0.0
Submit changes using
make htmlin thecqme/folder (not itsdoc/subfolder!).Commit your source file changes using
git add .in thecqme/folder and then:git commit -m "<commit-message>"
Replace
<commit-message>inside the quotes with a brief description of changes you made.
1. Desktops and the users
All computers are installed Linux operating system (OS). There are two filesystems:
$HOMEand/workspace. The full-paths of the$HOMEdirectory can be seen by commandecho $HOME. The space of$HOMEis only 10GB, thus you should use$WORKto store your works.These computers are managed by Sysnet. You do not have root privilege, thus every installation or requirement must be submitted through email rt@oden.utexas.edu
If you want to ssh to your lab computer from off-campus site. Follows these instructions.
2. Printers
Texas Advanced Computing Center (TACC)
0. TACC resources
High performance, petascale computing systems
Visualization laboratories
Cloud Computing services
Data Services
1. Request a New TACC Account
Go to the TACC User Portal home and click the “Create Account” link on the lower left side of the page.
Enter all required fields in the request form.
You’ll soon receive a confirmation e-mail from TACC at the e-mail address you provided containing a URL to verify your e-mail address. Click on the link to accept the TACC Acceptable Use Policy and validate your e-mail address.
2. Login clusters with MFA and SSH
The access from a desktop/laptop (PC) is allowed through a cryptographic network protocol called SSH (Secure Shell). You can connect from anywhere as long as your desktop/laptop have internet. There are several tools providing SSH.
In Linux-based or MacOS, we can directly use Terminal application.
Examples: Login to Lonestar6/Stampede2/Frontera. From your PC, open a terminal and command one of the following lines
ssh -X user@ls6.tacc.utexas.edu
ssh -X user@stampede2.tacc.utexas.edu
ssh -X user@frontera.tacc.utexas.edu
with “user” is your TACC account username. The access process after that needs Multi-Factor Authentication (MFA). The first authentication requires password of user and the second requires token number. TACC provides “TACC Token app” to generate token number or sends a message to your phone. You can choose one of these methods.
To simplify your access, you can configure these clusters in a file ~/.ssh/config, for example
Host lonestar
  Hostname ls6.tacc.utexas.edu
  User user
  ForwardX11 yes
Host stampede
  Hostname stampede2.tacc.utexas.edu
  User user
  ForwardX11 yes
Host frontera
  Hostname frontera.tacc.utexas.edu
  User user
  ForwardX11 yes
And now, you just simply access by, e. g.,
ssh lonestarorssh stampedeorssh frontera
3. Compilation
User environment
After passing through authentication, you will go to login nodes of clusters. The login shell for your user account is command language bash. Users are able to set up your customizations in ~/.bashrc file then activate it by running
source ~/.bashrcin a terminal.Environment variables: Set-up environment variables in ~/.barshrc file
PATH: where to find commandMANPATH: where to find helpLD_LIBRARY_PATH: where compilers find libs such as mkl, etc…Or other environment variables for specific applications
More details about setting up environment variables in Linux is in this website.
Module commands
TACC’s clusters use Environment Modules open source package to help users to initialize shell environment. All neccesary libraries or applications can be loaded using this package. A few important commands
List the modules already loaded:
module listShow what modules are available to be loaded:
module availLoad a package:
module load package_nameUnload a package:
module unload package_nameChange from package_1 to package_2:
module sw package_1 package_2Go back to an initial set of modules:
module resetAccess a help file of a module:
module help package_nameShow the description section of a module:
module whatis package_nameFind detailed information about a particular package:
module spider package_nameormodule show package_name
Compile your programs
Need a specific software, you can first try
module availormodule spider module_nameto check the software needed is already available. If it is,module load module_nameIf the software needed is not available, you can build your own version using make command. Download the software and follow instructions. Use module load command to initialize all dependencies (e.g. MKL lib) before going to compilation.
For python-base software, you can simply use
pip3 install package_namecommandYou can also specifically use gcc, gfortran, icc, ifort,… commands to compile serial C/Fortran codes or mpiicc, mpif90, mpiifort,… to compile parallel C/Fortran codes
Compile ABINIT on TACC
The compilation of ABINIT is somehow more complicated. ABINIT requires libXC, netcdf, hdf5,… by default. These libraries can accompany ABINIT code or can be downloaded and built separately. TACC provided netcdf and hdf5 libraries, so you only need to compile libXC.
Download ABINIT from this webpage and compile it as follows
tar -zxvf abinit-x.x.x.tar.gz; cd abinit-x.x.x
module purge
module load TACC
module load hdf5/1.10.4
module load netcdf/4.6.2

./configure --prefix=absolute_path_to_store_executive_program_of_abinit \
--enable-openmp --enable-memory-profiling --with-linalg='yes' --with-mpi='yes' \
--with-config-file=ac9 FC=mpif90 CC=mpicc CPP=cpp FPP=fpp

make -j8
make install
Use
./configure --helpif you want to see all options of configuration. Here ac9 file contains other needed FLAGS or library PATHS and should be created in abinit-x.x.x directory.ac9 file for Frontera
FCFLAGS="-O2 -xCORE-AVX2 -axCORE-AVX512,MIC-AVX512 -g -traceback -extend-source -noaltparam -nofpscomp -mkl"
CFLAGS="-O2 -g -traceback"
with_libxc=absolute_path_you_compiled_libXC
with_hdf5=/opt/apps/intel19/hdf5/1.10.4/x86_64
with_netcdf=/opt/apps/intel19/netcdf/4.6.2/x86_64
with_netcdf_fortran=/opt/apps/intel19/netcdf/4.6.2/x86_64
ac9 file for Lonestar6
FCFLAGS="-O2 -g -traceback"
CFLAGS="-O2 -g -traceback"
with_libxc=absolute_path_you_compiled_libXC
with_hdf5=$TACC_HDF5_DIR
with_netcdf=$TACC_NETCDF_DIR
with_netcdf_fortran=$TACC_NETCDF_DIR
Make sure environment variables such as $TACC_HDF5_DIR, $TACC_NETCDF_DIR not void. If they are, use
module show hdf5/1.10.4ormodule show netcdf/4.6.2to get correct variable names or you can use absolute paths as Frontera above.WARNING!!! To avoid I/O errors with netcdf and hdf5 files on Frontera, manual setting for Lustre striping is highly recommended, e. g.,
lfs setstripe -c 8 -S 32m directory_run_ABINIT, where 8 is number of stripes (maximum for $SCRATCH) and 32 is memory per stripe (in MB, maximum for $SCRATCH). You should setstripe for directory_run_ABINIT before creating any input files/folders inside of it. Uselfs --helpto see more options.For Lonestar6, $SCRATCH is BeeGFS filesystem ($WORK is still Lustre). Use
beegfs-ctl --setpattern --numtargets=24 --chunksize=32m directory_run_ABINITfor setting 24 stripes (maximum 72 for $SCRATCH) and 32 MB space for each. Usebeegfs-ctl --helpfor more details. Moreover, to avoid any potential problem with IO, you should use CDTools to write and read files in/tmpspace. Set up following additional commands in submission file
export CDTools=/scratch/tacc/apps/CDTools
export PATH=${PATH}:${CDTools}/bin

# Distribute directories to the local /tmp space
distribute.bash absolute_path/your_working_dir
# run job
ibrun -np 74 abinit ...
# Collect the job output files from the /tmp space
collect.bash /tmp/your_working_dir absolute_path/your_working_dir
If your jobs still have trouble with I/O files, TRY to compile ABINIT via mvapich compiler instead of intel compiler impi.
4. Run your jobs
TACC do not allow any application to run directly in a terminal except a serial python program and software compilation/installation. TACC is using a job scheduler to run jobs: Simple Linux Utility For Resource Management (SLURM) Workload Manager
All job submission files are written in bash shell language. For example, when doing relaxation job using PWscf code in Quantum Espresso, we prepare a relax.in input file and a submit.sh file in a same directory. A template of submit.sh
#!/bin/bash
#SBATCH -J relax              # Job name
#SBATCH -o jobout.%j          # Name of stdout output file
#SBATCH -e joberr.%j          # Name of stderr error file
#SBATCH -p normal             # Queue (partition) name
#SBATCH -N 1                  # Total # of nodes
#SBATCH -n 65                 # Total # of mpi tasks
#SBATCH -t 48:00:00           # Run time (hh:mm:ss)
#SBATCH --mail-type=all       # Send email at begin and end of job
#SBATCH -A name_of_project    # Project/Allocation name (req'd if you have more than 1)
##SBATCH --mail-user=username@tacc.utexas.edu     # This's now in comment mode with one more # tag

# Load all modules needed
module purge
module load TACC
module list

# export the path which contains executable file
export PATH="your_absolute_path/qe-6.4.1/bin:$PATH"

# echo working directory and starting time
pwd
date

# Launch MPI code...
# Use ibrun instead of mpirun or mpiexec
MPI="ibrun"
# Total # of parallel tasks
MPIOPT="-np ="$SLURM_NTASKS
# Kpoint parallel groups in PWscf, in fact there are many parallel levels
KPTPRL="-npool 5"
# executable file of PWscf in the $PATH above
PW="pw.x"
# run job
${MPI} ${MPIOPT} ${PW} ${KPTPRL} -inp relax.in > relax.out
# echo finishing time
date
For lonestar6 and stampede2 the name_of_project is “EPW-QE-Tests”. The submission is then done by command
sbatch submit.shThe number cores per node are different from clusters and partitions. For normal partition, there are 24, 68 and 56 cores per node for lonestart5, stampede2 and frontera, respectively. The maximum wall time is two days (48 hours).
Other commands to monitor your job after submitting
See the status:
squeue -u your_user_name. For instance, I have two jobs with one queuing and one running in the following

Cancel a job:
scancel JOBIDYou can also monitor your jobs with:
showq -u your_user_nameSee limitations of submission:
qlimitsSee full information about a specific job:
scontrol show job JOBID
If users do not want to queue too long for testing jobs, using of development partition is a solution. In addition, the interactive mode is also provided. In the terminal at login node, you are able to command
idev -m 60 -N 2with option -m is time in minute while -N is number of nodes you ask for. More options can be seen by commandidev --help. You can also see limitations of development partition withqlimits. Whenidevleads you todevelopmentinteractive mode, you have run your jobs directly in terminal instead of using submission file.Job array support in SLURM: For submitting and managing collections of similar jobs quickly and easily. More details
Parallel affinity: When running parallel, e.g. MPI, with many tasks, the way in which task_IDs are assigned to physical positions of cores in supercomputers is able to influence efficiency of parallelization. In general, if we don’t customize this, task_IDs will be logically configured in default.
ibrunprovides task_affinity variable to set up affinity between cores. Here are links with more info for Lonestar6, Stampede2, and Frontera. Another tool is directly to usesrunin SLURM instead ofibrun(see here).
5. Filesystem
On Lonestar6, Stampede2 and Frontera, three filesystems are provided:
$HOME,$WORKand$SCRATCH.To see the full path of these directories, use
echocommand, e. g.echo $HOME.These are separate filesystems.
They are accessible from both login node and compute node in the system.
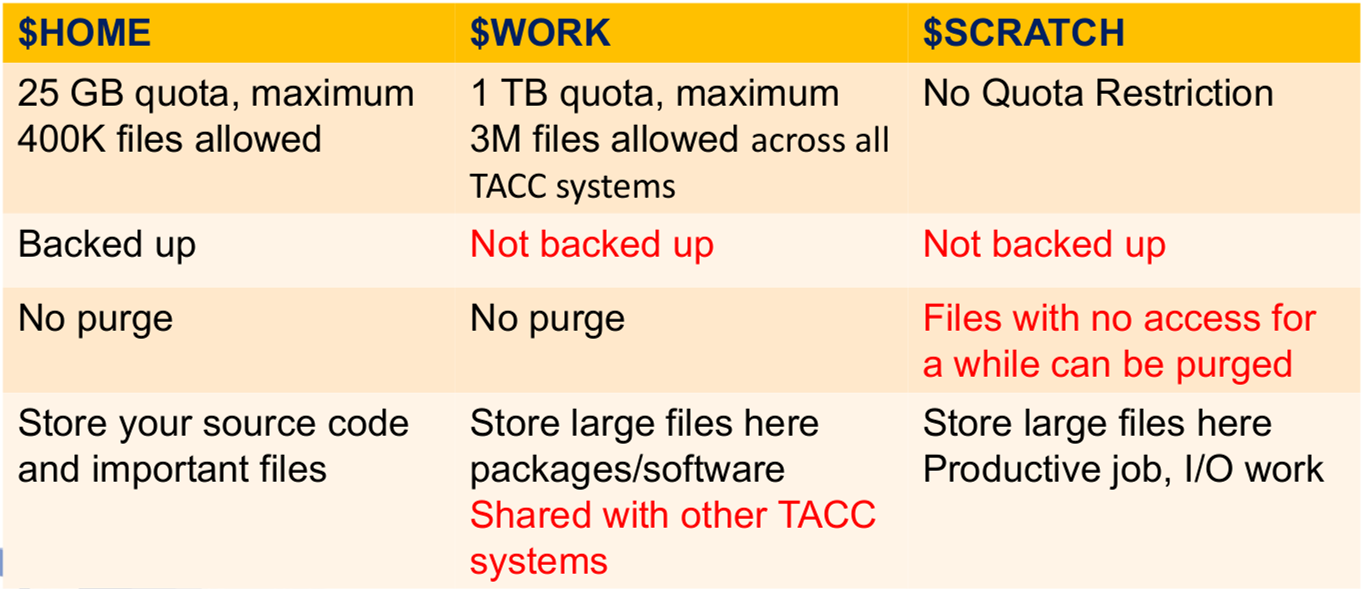
[Source: Si Liu_TACC]
The
$WORKfile system is mounted on the Global Shared File System ($STOCKYARD) and can be directly accessed from others (you can ls or cp files directly) while$HOMEand$SCRATCHare only mounted locally on each of them. In the login node, you can quickly go to these directories by using shortcut commands cdw (for$WORK), cdh or cd (for$HOME), and cds (for$SCRATCH). To go to$STOCKYARD(where you can access$WORKdirectories of all TACC supercomputers as subdirectories), use cdg.Transfer files from Lonestar6/Stampede2/Frontera to your local computer and vice versa using scp command. Suppose that you already configure all clusters in the file ~/.ssh/config
Copy from clusters to your PC
scp -r lonestar:cluster_directory_file_stored/file_name PC_directory_you_wantscp -r stampede:cluster_directory_file_stored/file_name PC_directory_you_wantscp -r frontera:cluster_directory_file_stored/file_name PC_directory_you_want
Copy from your PC to clusters
scp -r PC_directory_file_stored/file_name lonestar:cluster_directory_you_wantscp -r PC_directory_file_stored/file_name stampede:cluster_directory_you_wantscp -r PC_directory_file_stored/file_name frontera:cluster_directory_you_want
It is better to have all paths (cluster_directory_file_stored, cluster_directory_you_want,…) be in absolute paths.
Sharing data between users
Users in the same or different research groups can share data to each other. For users in the same research (project) group, they can share data together using group ID. More details can be found at this website
For users in different research groups, sharing is more complicated. A powerful tool named Access Control Lists (ACLs) is provided on clusters of TACC. More details, see details here.
The following example shows how to share data in lonestar with another user using
setfaclcommand of ACLs

The
user_sharedcan see and copy file_shared and directory_shared from your $WORK directory. After everything is done, you should rechange permission mode (chmod) of your $WORK path to secure your data. See details about chmod commandBackup final data using RANCH storage
6. Heavy Input-Output (IO)
When your program/executable accesses (reads or writes) to disk an excessive amount, it can cause problems for filesystems. For instance,
Reading/writing 100+ GBs to checkpoint or output files frequently
Running with 1024+ MPI tasks all reading/writing individual files
Parallel Python jobs using more than 2-3 python modules such as pandas, numpy, matplotlib, mpi4py,…
A few tips
Keep data in memory as much as possible instead of external file.
Do not use
$HOMEor$WORKfor production jobs, instead use$SCRATCH(if the IO workload is OK) or/tmpon each compute node (if the IO workload is heavy).Do not forget the backup the data under ``$SCRATCH`` (subject to purge).
Avoid writing one (or more) file(s) per process/task.
Avoid open/close the same file repeatedly.
Avoid read/write the same file from different tasks all the time.
More tips from TACC can be found here.
National Energy Research Scientific Computing Center (NERSC)
0. Perlmutter Resources
Architecture (CPU and GPU): 1536 GPU nodes and 3072 CPU nodes.
1 GPU node = 64 CPUs (AMD) + 4 GPUs (NVIDIA). 1 CPU node = 64 CPUs (AMD)
Submit jobs (detailed documentation). An example for GPU:
#!/bin/bash
#SBATCH -A m3682_g
#SBATCH -q regular           # or 'debug' for testing run
#SBATCH -N 10                # Number of nodes
#SBATCH --ntasks-per-node=4  # Number of MPI tasks per node. Try to keep it = number of GPUs
#SBATCH --gpus-per-task=1
#SBATCH --gpu-bind=none
##SBATCH --gpu-bind=map_gpu:0,1,2,3
#SBATCH -c 32                # 2 x 64 / --ntasks-per-node
#SBATCH -C gpu
#SBATCH -t 6:50:00
#SBATCH -J rlx
#
export LC_ALL=C
module load gpu
module swap PrgEnv-gnu PrgEnv-nvidia
module unload darshan
module unload cray-libsci
module load cray-fftw
module load cray-hdf5-parallel
export PATH="/global/homes/a/anhhv/progs/qe-7.2/bin:$PATH"
#
export SLURM_CPU_BIND="cores"
export OMP_PROC_BIND=true
export OMP_PLACES=threads
export OMP_NUM_THREADS=32      # <= the number of threads of CPUs
#
date
# Currently, paralelization over k-points is the best. Always try to set -nk = MPI tasks. If you're
# tight by memory, gradually try to increase number of nodes and keep -nk is a divisor of MPI tasks.
# Wavefunctions will be distributed (automattically) among GPU-nodes and QE will be able to run.
# The combination with -nb or -ndiag has never been tested. If you want, DIY and provide more information
# here for everybody. Turning on -nt raised errors, keep it = 1.
#
srun pw.x -nk 4 -nb 1 -ndiag 1 -pd true -nt 1 < relax.in > relax.out
date
Quantum Espresso/PWscf (detailed documentation for build and run).
QE_GPU recent paper QUANTUM ESPRESSO: One Further Step toward the Exascale.
A test with QE-v7.2 showed a mismatch in format of “data-file-schema.xml” and “charge-density.dat” files (maybe wfcxxx.dat files as well) between CPU and GPU versions. Fortunately, prefix.dvscf_qxxx, prefix.dyn_qxxx, and prefix.phsave/dynmat.xxx.xxx.xml files produced by ph.x code are the same in both.
1. Request an NEW Account
2. Run GPU-accelerated softwares
QuantumESPRESSO
BerkeleyGW
Build version 4.0@GPU. Do as follows
tar -zxvf BerkeleyGW-4.0.tar.gz
cd BerkeleyGW-4.0

module swap PrgEnv-gnu PrgEnv-nvhpc
module load cray-hdf5-parallel
module load cray-libsci
module load python
module load PrgEnv-nvhpc/8.5.0

module load craype-x86-genoa
module load craype-x86-milan
module load craype-x86-milan-x
module load craype-x86-rome
module load craype-x86-spr
module load craype-x86-trento
module load cray-fftw/3.3.10.6

cp config/perlmutter.nvhpc.gpu.nersc.gov.mk arch.mk

make cleanall
make all-flavors
3. Storage Systems
Perlmutter Scratch. Perlmutter Scratch is an all-flash Lustre file system designed for high performance temporary storage of large files.
Community File System. The Community File System (CFS) is a global file system available on all NERSC computational systems. Our path is /global/cfs/cdirs/m3682.
Argonne Leadership Computing Facility (ALCF)
Polaris
Compilation of QE with GPU
./configure --with-cuda=$NVHPC/Linux_x86_64/23.9/cuda/12.2 --with-cuda-runtime=12.2 --with-cuda-cc=80
make -j4 epw
Example job script
An example job script that runs on 1 computing node (select=1). Note that each computing node in Polaris has 4 GPUs.
example.job.sh:
#!/bin/sh
#PBS -N example_job
#PBS -l select=1
#PBS -l walltime=00:30:00
#PBS -q debug
#PBS -A NovelSemi
#PBS -l filesystems=home:eagle
#
cd ${PBS_O_WORKDIR}
#
NNODES=`wc -l < $PBS_NODEFILE`
# each Polaris node has 4 GPUs
NRANKS_PER_NODE=4
NDEPTH=8
# no openmp
NTHREADS=1
#
# total ranks
NTOTRANKS=$(( NNODES * NRANKS_PER_NODE ))
echo "NUM_OF_NODES= ${NNODES} TOTAL_NUM_RANKS= ${NTOTRANKS} RANKS_PER_NODE= ${NRANKS_PER_NODE} THREADS_PER_RANK= ${NTHREADS}"
#
export OMP_NUM_THREADS=$NTHREADS
#
export QEDIR=$HOME/q-e
export PW=$QEDIR/bin/pw.x
export PH=$QEDIR/bin/ph.x
export Q2R=$QEDIR/bin/q2r.x
#
export PP=$QEDIR/EPW/bin/pp.py
export EPW=$QEDIR/bin/epw.x
#
export MPIRUN="mpiexec -n ${NTOTRANKS} --ppn ${NRANKS_PER_NODE} --depth=${NDEPTH} --cpu-bind depth ./set_affinity_gpu_polaris.sh"
export NPOOL=4
#
$MPIRUN $PW -nk $NPOOL < scf.in > scf.out
In order to bind 1 GPU for 1 MPI rank a helper script was used to set CUDA_VISIBLE_DEVICES.
set_affinity_gpu_polaris.sh:
#!/bin/bash -l
num_gpus=4
# need to assign GPUs in reverse order due to topology
# See Polaris Device Affinity Information:
# https://www.alcf.anl.gov/support/user-guides/polaris/hardware-overview/machine-overview/index.html
gpu=$((${num_gpus} - 1 - ${PMI_LOCAL_RANK} % ${num_gpus}))
export CUDA_VISIBLE_DEVICES=$gpu
echo “RANK= ${PMI_RANK} LOCAL_RANK= ${PMI_LOCAL_RANK} gpu= ${gpu}”
exec "$@"
Working in an interactive session
qsub -I -l select=1 -l walltime=1:0:0 -l filesystems=home:eagle -A NovelSemi -q debug
Aurora (Exascale)
Waiting for its public. About it
Oak Ridge National Laboratory (ORNL)
Summit
Please try your best to utilize GPUs because we have very limited resources on Summit!. This has 4,608 nodes. Each node has 6 GPU nodes NVIDIA Volta V100s and 22 CPU cores IBM Power 9 (2.8 GHz). They both share 512 GB DDR4 + 96 GB HBM2 memory. About SUMMIT
To compile GPU-supported Quantum Espresso on Summit, first follow the following steps:
module swap xl nvhpc/23.9 ; module load fftw ; module load hdf5 ; module load essl ; module load netlib-lapack

git clone https://gitlab.com/QEF/q-e.git
cd q-e

export BLAS_LIBS="-L$OLCF_ESSL_ROOT/lib64 -lessl"
export LAPACK_LIBS="-L$OLCF_ESSL_ROOT/lib64 -lessl $OLCF_NETLIB_LAPACK_ROOT/lib64/liblapack.so"

./configure --enable-openmp --with-hdf5=$OLCF_HDF5_ROOT \
         --with-cuda=$OLCF_CUDA_ROOT --with-cuda-runtime=11.0 --with-cuda-cc=70

sed -i "/DFLAGS/s/__FFTW3/__LINUX_ESSL/" make.inc
sed -i "/CFLAGS/s/= /= -c11 /" make.inc
Then, add the following lines in your make.inc file:
FFT_LIBS      = \
               -L$(OLCF_ESSL_ROOT)/lib64/ -lessl \
               -L$(OLCF_FFTW_ROOT)/lib/ -lfftw3 -lfftw3_threads -lfftw3_omp \
                 ${CUDALIB}  -lstdc++

# HDF5

HDF5_LDIR    = $(OLCF_HDF5_ROOT)/lib/
HDF5_LIBS    = $(HDF5_LDIR)/libhdf5_hl_fortran.so \
               $(HDF5_LDIR)/libhdf5_hl.so \
               $(HDF5_LDIR)/libhdf5_fortran.so \
               $(HDF5_LDIR)/libhdf5.so -lm -lz -ldl  -lstdc++
and remove the line
-L/autofs/nccs-svm1_sw/summit/spack-envs/summit-plus/opt/nvhpc-23.9/hdf5-1.14.3-xbbclhuxwc4bjjwrvamvxpoih6bdrs2y/lib -lhdf5_fortran -lhdf5
After that, you can compile your QE as usual:
make -j4 pw
Note that if you enable CUDA, then the current version of EPW cannot run. So, in order to compile a CPU-only EPW, you should remove the lines that are related to cuda when executing the configure command.
./configure --enable-openmp --with-hdf5=$OLCF_HDF5_ROOT
Even though the BerkelyGW 4.0 has a arch.mk file for Summit, it does not enable HDF5. To enable HDF5, use the following arch.mk file (for BGW 4.0) instead.
# arch.mk for BerkeleyGW codes
#
# suitable for Summit ORNL
#
# MDB
# 2024, ORNL
#
# Do:
# module swap xl nvhpc/23.9 ; module load fftw ; module load hdf5 ; module load essl ; module load netlib-lapack
#
#
COMPFLAG  = -DNVHPC -DNVHPC_API -DNVIDIA_GPU
PARAFLAG  = -DMPI  -DOMP
MATHFLAG  = -DUSESCALAPACK -DUNPACKED -DUSEFFTW3 -DOPENACC  -DOMP_TARGET  -DHDF5
CUDALIB= -lcufft -lcublasLt -lcublas -lcudart -lcuda -lnvToolsExt
#

# FCPP    = /usr/bin/cpp -C -E -P  -nostdinc   #  -C  -P  -E  -nostdinc
FCPP    = cpp  -P -ansi  -nostdinc  -C  -E  -std=c11
#F90free = mpif90 -Mfree -acc -mp=multicore,gpu -ta=tesla -Mcuda -Mcudalib=cublas,cufft -Mcuda=lineinfo -Minfo=mp -Mscalapack # -g -traceback
#LINK    = mpif90 -Mfree -acc -mp=multicore,gpu -ta=tesla -Mcuda -Mcudalib=cublas,cufft -Mcuda=lineinfo -Minfo=mp -Mscalapack # -g -traceback
F90free = mpif90 -Mfree -acc -mp=multicore,gpu -gpu=cc70  -cudalib=cublas,cufft  -traceback -Minfo=all,mp,acc -gopt -traceback
LINK    = mpif90        -acc -mp=multicore,gpu -gpu=cc70  -cudalib=cublas,cufft  -Minfo=mp,acc # -lnvToolsExt
# FOPTS   = -O1 # -fast
FOPTS   = -fast -Mfree -Mlarge_arrays
FNOOPTS = $(FOPTS)
#MOD_OPT =  -J
MOD_OPT =  -module
INCFLAG = -I

C_PARAFLAG  = -DPARA -DMPICH_IGNORE_CXX_SEEK
CC_COMP = mpiCC
C_COMP  = mpicc
C_LINK  = mpiCC
C_OPTS  = -mp -fast
C_DEBUGFLAG =

REMOVE  = /bin/rm -f

# this must be linked if non ESSL blas library is missing are missing
#               -L$(OLCF_NETLIB_LAPACK_ROOT)/lib64/ -llapack -lblas \
#               -L$(OLCF_NETLIB_SCALAPACK_ROOT)/lib/ -lscalapack  \

FFTWLIB      = \
               -L$(OLCF_ESSL_ROOT)/lib64/ -lessl \
               -L$(OLCF_FFTW_ROOT)/lib/ -lfftw3 -lfftw3_threads -lfftw3_omp \
                 ${CUDALIB}  -lstdc++
FFTWINCLUDE  = $(OLCF_FFTW_ROOT)/include/
PERFORMANCE  =

HDF5_LDIR    = $(OLCF_HDF5_ROOT)/lib/
HDF5LIB      = $(HDF5_LDIR)/libhdf5_hl_fortran.so \
               $(HDF5_LDIR)/libhdf5_hl.so \
               $(HDF5_LDIR)/libhdf5_fortran.so \
               $(HDF5_LDIR)/libhdf5.so -lm -lz -ldl  -lstdc++
HDF5INCLUDE  = $(HDF5_LDIR)/../include


LAPACKLIB = -L$(OLCF_ESSL_ROOT)/lib64/ -lessl -L$(OLCF_NETLIB_LAPACK_ROOT)/lib64/ -llapack
# SCALAPACKLIB = -L$(OLCF_NVHPC_ROOT)/comm_libs/openmpi4/openmpi-4.0.5/lib/ -lscalapack
SCALAPACKLIB = $(OLCF_NVHPC_ROOT)/comm_libs/12.2/openmpi4/openmpi-4.1.5/lib/libscalapack.a
#
#PRIMMELIB = /ccs/home/mdelben/frontier_BGW/SUMMIT_libs/primme-3.1.1/lib/libprimme.a
#PRIMMEINCLUDE = /ccs/home/mdelben/frontier_BGW/SUMMIT_libs/primme-3.1.1/include/
#
TESTSCRIPT =
#
You should consult the Summit user guide for more descriptions of preparing the jobscript, especially to understand how to use GPU and the concept of resource set.
But you if you want to have a quick test, below is a workable script submit.lsf for me:
#!/bin/bash
#BSUB -P CPH167
#BSUB -W 02:00
#BSUB -nnodes 12
#BSUB -q debug
#BSUB -alloc_flags gpumps
#BSUB -J SiO2


module swap xl nvhpc/23.9 ; module load fftw ; module load hdf5 ; module load essl ; module load netlib-lapack

QEPATH=/ccs/home/zhenbang/EPW_developer/q-e/bin
EPWPATH=/ccs/home/zhenbang/EPW_developer/EPW_CPU_ONLY/bin
export OMP_NUM_THREADS=1

jsrun -n 72 -a 1 -c 1 -g 1 $QEPATH/pw.x -nk 72 -nd 1 < scf.in > scf.out
jsrun -n 72 -a 1 -c 1 -g 1 $QEPATH/ph.x -nk 72 -nd 1 < ph.in > ph.out
To submit the jobscript,
bsub submit.lsf
Frontier
This has 9,408 nodes. Each node has 4 GPU nodes AMD Instinct MI250X (with 128 GB memory) and 128 CPU cores AMD Epyc 7713 Trento (2.0 GHz) (with 512 GB DDR4).
About Frontier
Computational resources acknowledgment
The authors acknowledge the Texas Advanced Computing Center (TACC) at The University of Texas at Austin for providing HPC resources, including the Frontera and Lonestar6 systems, that have contributed to the research results reported within this paper. URL: http://www.tacc.utexas.edu. This research used resources of the National Energy Research Scientific Computing Center, a DOE Office of Science User Facility supported by the Office of Science of the U.S. Department of Energy under Contract No. DE-AC02-05CH11231. This research used resources of the Argonne Leadership Computing Facility, which is a DOE Office of Science User Facility supported under Contract DE-AC02-06CH11357.